Maple Alps

beans

How To Cook [Garbanzo] Beans - Using a Pot, Instant Pot, or Slow Cooker

Recipes, HealthAmanda Walter | Maple AlpsComment

I love the versatility of garbanzo beans (also known as chick peas)! You can put them in a salad, roast them in the oven to make a quick snack, have them in a bowl or even crush them to make a spread or burgers. Beans of any sort are great to keep in the pantry, and if you are trying to save money on groceries, a fantastic way to do that is to buy beans dry! They keep a long time, and they are easy to prepare and freeze if you want to keep them on hand. Plus, if you have concerns about the sodium content in canned beans, dried is the way to go! Canned or not, you definitely need beans in your diet, so I decided to do a quick "how to" post to help you out. 

Affiliate links are used in this post

How To Cook [Garbanzo] Beans | www.maplealps.com

This how-to really applies to any bean and there are several ways to cook them. 

Step One: Sort
Check your beans for any broken fellows or other debris or stones you may find in a dry bag of beans. You will want to get all of that out.

Step Two: Rinse
Pretty self-explanatory.

Step Three: Soak
Now, soaking is optional actually! The thing about soaking is that it will cut your actual cooking time down (Saving you on gas/electricity - whatever your stove runs on), and it will also make beans less of a "musical fruit," as it allegedly helps break down some of the indigestible sugars that cause flatulence. I honestly don’t notice any difference between soaking or not. The easiest way to soak beans is overnight. Just make sure water is about 2-3 inches above them and sleep the night away. Waiting is easier then. You can also do a quick soak by putting them in a pot with water, bringing it to a boil, and then taking them off the heat and let them soak for an hour.

How To Cook Garbanzo Beans | www.maplealps.com

Step Four: Cook

Cooking Garbanzo Beans on the Stovetop

Again, make sure there is 2-3 inches of water covering your beans and bring the pot to a boil - slowly though. Bring the pot to a simmer, and stir occasionally, scraping off any foam that on the surface (you won't get too much with garbanzos). You will know your beans are done when they are tender (you can mash or poke them with a fork - or eat one like I tend to do....hehe)


Cooking Garbanzo Beans in the Slow Cooker

  • 3 cups garbanzo beans

  • 7 cups water

Cover and cook on high in your slow cooker for 4 hours, or on low for 8 to 9 hours - or until tender.


Cooking Garbanzo Beans in the Instant Pot (My favourite method):

  • 3 cups garbanzo beans

  • 7 cups water

If you are doing them from dry garbanzo beans, add the beans and water to your inner pot and set your pot to high pressure for 45 minutes. If your beans are soaked, set your pot to high pressure for 12 minutes.

Let pressure release naturally for 10 minutes and move steam release to venting to release the remaining pressure.


How To Cook Garbanzo Beans | www.maplealps.com

Step Five: Store
Beans will stay good in the refrigerator for several days, but I like to keep them in the freezer for easy and quick access. You can put them in little bags or freezer-friendly containers and they will stay several months in the freezer. I suppose you could can them as well, but I personally like the freedom with how many I want to use with the freezing method. I don't always use an entire cans worth.

Tip: If you want, portion them out into portions of 1.5 cups - about the amount in a can.

Yay! You are now ready to save time (with some planning, of course) and money!


How do you cook your beans? What do you cook with them?



Spinach & Black Bean Enchiladas (vegan)

RecipesAmanda Walter | Maple Alps22 Comments

After the holidays and travelling for so long, the last thing I wanted to do after I came home was cook. There's nothing worse than coming home after living out of a suitcase for 2 weeks and having to come up with a complete meal when the fridge and pantry are basically empty. It's not motivating in the least.

We ended up running to the grocery store and making some paninis with our panini grill, but I was reminded later that I probably had some freezer meals left over. 

I love freezer meals. Once in a while I'll do a huge cooking haul, and prep meals enough for the month. The freezer is a wonderful thing, especially on days I don't want to cook, or know I will be too busy to do so. It's mostly for the benefit of my husband, who requires good and balanced meals. I suppose I do too, but I'm honestly the eat-cereal-for-dinner kind of gal when I'm too tired to care. 

On those days, it's very handy to have my freezer stocked with some of our favourite meals. It's win-win, since I don't really have to cook, and we still get to enjoy a homemade meal. That being said, we don't eat a meal from the freezer every day - I'm not that lazy! Today I'm going to share with you one of our favourite freezer meals!

Spinach & Black Bean Enchiladas (vegan) | www.maplealps.com

I've been experimenting with all sorts of enchilada recipes, but I keep coming back to this basic recipe, since it's quick, simple, and still really yummy! Spinach is probably my favourite thing to add to dishes, so naturally, I love this.

On meal prep days, sometimes I will make double the amount so that our freezer is always full of enchiladas! 

Black Bean & Spinach Enchiladas (vegan) | www.maplealps.com

They're quick to make up too, which makes Sunday prep days really painless. I can't complain when something is easy, and still tastes like a lot more effort went into it. 

I'm hoping to share some more freezer friendly meals soon, but for now, try this one out. You will love it.

Black Bean & Spinach Enchiladas (vegan) | www.maplealps.com

Spinach and Black Bean Enchiladas

For the Enchiladas

  • 15 oz. can black beans

  • 1 cup frozen corn

  • 6 oz. baby spinach

  • 2 cloves garlic, minced

  • 1 small red onion

  • 1/3 cup chopped cilantro

  • 2 tsp. cumin

  • 2 cups shredded vegan cheese (optional)

  • Green onion for garnish

  • 10 large tortilla shells

Sauce (or use this recipe)

  • 3 cups vegetable broth (try this homemade one!)

  • 1/2 C tomato paste

  • 1/4 C flour (I use whole wheat white flour)

  • 2 TBSP olive oil

  • 2 tsp. cumin

  • 1/2 tsp each: garlic powder, onion powder, chilli powder

  • salt/pepper to taste

1) Make the sauce by heating olive oil in a saucepan over medium heat. Add tomato paste, flour and spices.

2) Whisk for about a minute and add broth, slowly bringing it to a boil.

3) Reduce to simmer and cook until slightly thickened. Add salt/pepper for taste and set aside.

4) Saute red onion and garlic until softened. Add spinach and cook until slightly wilted.

5) In a large bowl, combine the rest of the ingredients and add onion, garlic and spinach mixture. 

6) Fill tortillas with mixture and roll tightly

7) Coat a 9x13 inch baking dish with some enchilada sauce and line the dish with rolled enchiladas, seam side down.

8) Pour remaining sauce generously over the enchiladas. Sprinkle some cheese on top (optional)

9) Bake at 375 degrees F for about 20 minutes

10) Garnish with fresh cilantro and green onions and try it with some homemade vegan sour cream

Freezer Friendly: As mentioned, I love freezing these for a quick meal on a busy weeknight. To freeze, line rolled enchiladas up on a parchment-lined baking sheet and place in the freezer until firm and ready to transfer to a freezer bag. 

Freeze enchilada sauce separately. 

To prepare, heat up sauce slowly in a saucepan and prepare as normal (see above). Bake covered for about 30 minutes and uncovered for another 20, or until done. 


Do you prepare meals in the freezer? Let me know if you try this or anything else by posting to social media and tagging #MapleAlps!


Spinach & Black Bean Enchiladas (vegan) | www.maplealps.com

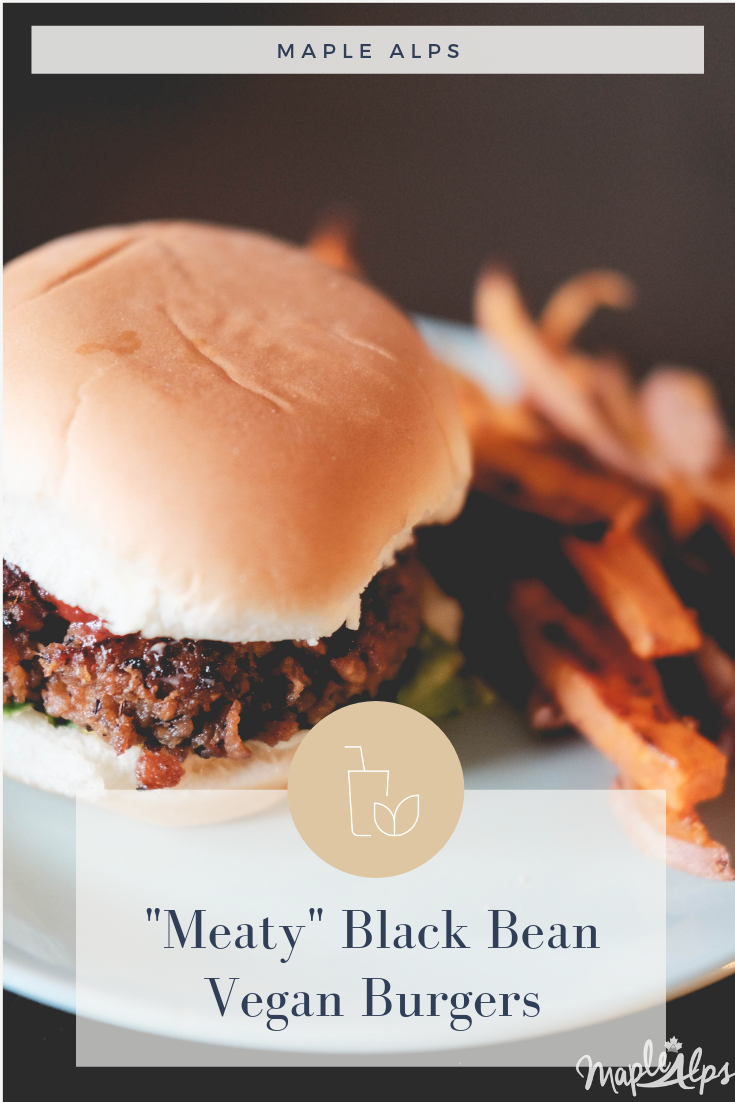
"Meaty" Black Bean Vegan Burgers

RecipesAmanda Walter | Maple Alps25 Comments

This weekend we celebrated Fall with a Fall Fest, complete with a hayride, veggie dogs and all the potato salad you could imagine. Now, we do love veggie dogs, but I think I've finally reached my limit for the year. Interestingly enough, we haven't had one burger bonfire, and I think next summer, we'll have to make that happen. Until then, I'll be experimenting with some patties, and sharing them with you.

In all honesty, these burgers are a result of wanting to use up leftovers in the fridge. Just goes to show, that your fridge can indeed be carrying treasures you didn't think of.

"Meaty" Black Bean Vegan Burger. Delicious! | www.maplealps.com

Beans are a serious staple around here. Once I started understanding how to prepare and keep them so that I don't have to buy cans of the stuff anymore (cheaper and healthier to buy dry!), life became so much easier. I had made some enchiladas with these beans. Since I had plenty left, I figured a burger would be the perfect project. 

I wanted something more "meaty" in texture, however; something a little chewier... That does sound strange now that I type it out, but I'm just going to leave that there. I decided to add some TVP and see what happened. 

"Meaty" Black Bean Vegan Burgers. Delicious! | www.maplealps.com

Because the beans were already cooked, it cut down greatly on prep time for these delicious burgers! I even called a friend to come over for lunch, and did we feast! We topped them with fried onions and had sweet potato fries on the side.

"Meaty" Black Bean Vegan Burgers. Delicious! | www.maplealps.com

1 ½ C black beans - cooked (you could use canned too)
2 C TVP
1 large yellow onion - caramelized
¾ C vital gluten flour
1 tsp smoked paprika
1 tsp cumin
2 tsp sea salt
BBQ sauce

1) Soak TVP in about 2C hot water for ten minutes and drain well
2) While soaking, caramelize your onion and set aside - low heat and slow cooking is the key!
3) Add back beans to food processor and pulse until almost smooth. Add caramelized onions and pulse until a paste forms.
4) Add paste, drained TVP and spices to large bowl. Mix well and then add vital gluten flour.
5) Combine and start creating patties out of the mixture. You will get 8-10, depending on the size.
6) Heat a bit of oil in the pan and place a few patties in to pan fry. Slather each side with BBQ sauce and flip. 
7) Serve with your favourite toppings and enjoy!

"Meaty" Black Bean Vegan Burger. Delicious! | www.maplealps.com

PS: If you prefer something gluten-free, try these Juicy Smoked Chickpea Burgers


We love these topped with fried onions and with sweet potato fries on the side!


"Meaty" Black Bean Vegan Burgers | www.maplealps.com

Juicy Smoked Chickpea Burger (vegan with gluten free options)

RecipesAmanda Walter | Maple Alps22 Comments

It’s pretty much summer, and with summer comes my desire to be anywhere but the kitchen. It’s too hot to have the oven on and I would much rather be outside. However, even in summer, my husband appreciates warm meals (unlike me, who could just live off of smoothies, salads and popsicles all summer).

Since I prefer minimal time in the hot kitchen on hot days, I have been getting creative with summer meals. Burgers have always been a favourite, so it was only natural I figure out some ways to make a good patty. There were several versions I enjoyed, and I'll share the chickpea version with you today!

Juicy & Delicious Smokey Chickpea Burgers. #Vegan and #GlutenFree. So great and easy to make! A definite winner :D

When it comes to vegan burgers, I’ve had really good ones and really bad ones. One of the really good ones occurred when we went out to eat with some friends a few months ago. It was so delicious, and I don’t even know what it was made of. All I knew, was that it had this perfect smokey taste and just the right amount of BBQ sauce. It was on my mind for days, and I had to reinvent it.

Juicy Smoked Chickpea Burger (vegan with gluten free options)

On a side note, we've been clearing out our cupboards getting ready for a busy summer and a move, so I just went right there. I had a can of chickpeas, and I decided that was what my burger was going to be made of. 

By the way, I do enjoy making my beans from scratch now though!

Related: How to Cook Garbanzo Beans 3 Ways (Chickpeas)

Juicy Smoked Chickpea Burger (vegan with gluten free options)

It took several tries. I learned very quickly that I had to make sure it wouldn't crumble, and since we don't use eggs, it was a bit of a challenge with attempts I'd made in the past. I figured beans would help a lot with that, and was I ever right! With the oats and veggies in there, the texture was great - and the BBQ sauce....oh, the BBQ sauce...

Topped with some fried onion, a slice of vegan "cheese," and some fresh veggies, it's seriously delicious. 

The best part about these, are that they're light, and don't leave us feeling groggy and gross.

Juicy Smoked Chickpea Burger (vegan with gluten free options)

Juicy Smoked Chickpea Burger

what you need:

  • 15 oz. can chickpeas (or 1 1/2 cups if using cooked), drained and rinsed

  • Half Cup Rolled Oats

  • 3 TBSP BBQ Sauce

  • ½ Onion, Finely Diced

  • 1 Small Zucchini, Grated and dried well

  • ½ Small Carrot, Grated

  • About 1 tsp each: Salt, Cumin, Smoked Paprika

  • 3 Cloves Garlic, Minced

  • 2 tsp Olive Oil

what to do:

1) If using canned beans, drain and rinse well. Mash coarsely in a bowl with a fork. 

2) Add the rest of your ingredients and seasonings and mix very well. Your mixture should not be too wet, but wet enough to form. 

3) Shape the patties in your hand and lightly brown in heated fry pan. 

4) Serve as a plain patty, or put in a bun (gluten-free if needed) and top with your favourite burger toppings (we love vegan cheese, lettuce, tomato, and fried onions). Enjoy!

Note: These freeze and reheat well. 


What is your favourite thing to eat in the summer?

Let me know if you try out this burger by using the hashtag #MapleAlps! I love seeing what everyone comes up with! 


Pin this recipe:

Juicy & Delicious Smokey Chickpea Burgers. #Vegan and #GlutenFree. So great and easy to make! A definite winner :D
 

Black Bean Brownies (vegan + gluten-free)

RecipesAmanda Walter | Maple Alps22 Comments

I realized the other day that I haven't really baked anything in a while. The husband and I aren't huge baking (cake, etc.) eaters, so unless it's for someone else, I don't bake anything but bread. The one thing we do make an exception for once in a while are brownies. 

Brownies are so great. I just love them when they're warm and gooey, but still chewy. We fight over the corner pieces all of the time. 

As I was browsing Pinterest yesterday, I came across a recipe for black bean brownies from Minimalist Baker. I had seen this recipe plenty of times, and those brownies always looked so delicious, so I decided that it was the day I would make them. I had all of the ingredients on hand anyway! 

I was so excited about this, I wanted to share and give my own review of this recipe. 

Vegan Gluten Free Black Bean Brownies: A Pinterest Review

The best part about this recipe was that I only needed a food processor and a baking pan. Easiest clean-up plan ever! I was a bit concerned after blending everything because the batter was a bit runnier than how I felt it was described in the original recipe. They baked seemingly great despite that! 

Black Bean Brownies

I added sliced almonds to the brownies because for some reason, the whole chocolate/almond combination was really calling out to me. Maybe next time I'll go with walnuts. I learned today that they're a great source of omega-3! I like mixing things up anyway.

Black Bean Brownies

Note to me for next time: They need quite some time in the pan to cool before putting them on the rack. I lost two because of my excitement in getting them out and cooled. Well, they "lost" their form, is all. I gobbled them up, gooey mess and all.

Black Bean Brownies

Honestly, I went for these because they were vegan and gluten-free, but I feel like they aren't the healthiest because there is quite a bit of organic cane sugar in them. They are pretty packed with fiber though.

In either case, they needed to pass the husband test, and I think they did! They have just the right amount of chewy outside and gooey inside. Nothing quite matches a real brownie, but this comes in pretty high on the list. By the way, they definitely taste better the second day - I would know, since I had one for breakfast.... :)

Black Bean Brownies

Makes 12 - Serves 1 Chocolate Craving Female
From Minimalist Baker

1 3/4 (1 15oz can) cups black beans, well rinsed and drained
2 heaping Tbsp Flaxseed Meal
6 (90g) Tbsp water
3 Tbsp (45 g) coconut oil, melted
3/4 cup (72 g) cocoa powder
1/4 tsp sea salt
1 tsp pure vanilla extract
1/2 cup (105 g) organic cane sugar, slightly ground (I ran it through my food processor)
1 1/2 tsp baking powder

Optional fun toppings: crushed walnuts/pecans, sliced almonds or semisweet chocolate chips

1) Preheat oven to 350 degrees F (176 C).
2) Lightly grease a 12-cavity standard size muffin tin. 
3) Combine the flaxseed meal and water in the bowl of the food processor. 
4) Pulse a few times and then let stand for a few minutes.
5) Add all other ingredients (besides toppings) and puree for  about 3 minutes. Scrape down the sides as required
6) If the batter is too thick, add a Tbsp or so of water and pulse again. It should be quite thick, but not runny.
7) Evenly distribute the batter into the muffin tin.
8) Optional: Sprinkle with toppings of your choice
9) Bake for about 25 minutes, or until the tops are dry and the edges start to pull away from the sides.
10) Remove from the oven and allow to cool for 30 minutes before removing GENTLY from pan (I used a spoon to help with that). The insides are meant to be gooey, so don't be too alarmed if they are quite moist. Besides, they're vegan, so it's okay :) 

Store in an airtight container for up to a few days. 


I would definitely recommend this recipe to anyone who is adventurous enough to try it out! As a matter of fact, I think I'll try these on a vegan, gluten-free (ultimate guide to gluten-free eating anyone?) friend next week!

What about you? Will you try making these A+ brownies this weekend?